Genre Recognition With Deep Learning
May 27, 2016
Genre Recognition With Deep Learning
I’ve attempted genre recognition using deep learning. In this guide, I try to describe the steps needed to be taken to run my horrible code. Haha. This is mainly for the learning experience.
Since this is a machine learning task, we shall follow the typical procedure of:
- Collecting data
- Feature extraction
- Training and testing model
- Querying model
Preliminaries
Firstly, I am not a super l33t 10x software engineer and I cobbled up most of this code in a day. So, a lot of restructuring and refactoring should and could be done. This guide will show how to use the code as is. Clone the git repo, and switch the branch to working-model-0.1
git clone https://github.com/amirothman/genre-erkennung-pipeline
cd genre-erkennung-pipeline
git checkout working-model-0.1
Now you should have all the code. But not all the data. But first, let’s go through the requirement:
- keras (deep learning framework)
- sklearn (machine learning library)
- matplotlib (plotting)
- youtube-dl (to test data)
Outside of the python libraries we also require some command line tools:
- ffmpeg (manipulating audio files)
- sonic-annotator (Vamp feature extraction utility)
And we also need to install some Vamp plugins:
Refer to here for instructions to install vamp plugins on different platforms.
Collecting data
Most of the methods that are written within this code would have the folder “dataset” as the default directory path for the data. Create that folder inside the main project directory.
mkdir dataset
Inside this directory, you should create another directory containing your dataset.
cd dataset
mkdir my_data_set
Throughout the code base, we use the convention of train set and test set to separate our training data and testing data. Create those directories:
cd my_data_set
mkdir test
mkdir train
Now, you can put your data in the respective directories. The files need to be separated in different folders for different genres. The code would use the name of the directory as the genre. Here is an example of how a dataset directory should look like:
└── my_data_set
    ├── test
    │   ├── genre1
    │   │   ├── 010._Ольга_Василюк_-_Нет_Тебя.mp3
    │   │   ├── 017._Eros_Ramazzotti_-_Perfetto.mp3
    │   │   └── 018._T.I._Feat._Pharrell_-_Oh_Yeah.mp3
    │   └── genre2
    │       ├── 011._Maan_-_Perfect_World__Prod._by_Hardwell_.mp3
    │       ├── 015._Глюкоза_-_Согрей.mp3
    │       └── 016._Вика_Воронина_Feat._Storm_Djs_-_Угги.mp3
    └── train
        ├── genre1
        │   ├── 004._Prides_-_Out_Of_The_Blue.mp3
        │   ├── 008._Марина_Алиева_-_Подари_Любовь.mp3
        │   └── 009._Чи-Ли_-_Ангел_На_Моём_Плече.mp3
        └── genre2
            ├── 001._Paul_Van_Dyk_-_Lights.mp3
            ├── 002._Zedd,_Bahari_-_Addicted_To_A_Memory.mp3
            └── 003._MOYYO_-_Имя_Moyyo.mp3
I’ve written a bash script sample_song.sh to split the dataset into test set and training set. If you are a shell ninja, you can edit the script split the dataset.
By the way, you can have as many genres as you want. Just make sure:
- Both training set and testing have the same genres
- The split between test set and training set is sensible
The format of the audio can be any audio format that is supported by sonic-annotator and ffmpeg. One preprocessing step before we continue to feature extraction:
- is splitting the audio files into 30 second chunks - to make it more manageable
- merge stereo to mono - because we theorized that the genre of a song is independent from this property
To do this, we can use the split_30_seconds_mono.py script. The method to be used here is batch_thirty_seconds(folder_path,file_format). In our case, folder_path would be my_data_set and file_format would be mp3. You should edit this in the main part of the code.
batch_thirty_seconds(folder_path,file_format)
  folder_path: string of directory path (where the folder train and test is)
  file_format: string of audio format (e.g. 'mp3', 'au', etc.)
Run this script:
python split_30_seconds_mono.py
If your audio files contain spaces or some other weird characters, this script will throw an error. You can use the script space_to_underscore.sh to rename them.
Feature Extraction
Congratulations that you got this far. Now we will do feature extraction. What we will do is first convert the audio files into CSV files with feature, then convert the CSV files into Numpy arrays and serialize them with pickle. We can actually create the numpy arrays directly, skipping the csv files but:
- I was not aware of it during that time (Haha)
- It’s actually much slower. Probably because the vamp host is a python implementation.
The python script extract_features.py will be used here. The method is extract_features;
extract_features(path) path: string of data path to do feature extraction
You should edit this in the main part of the code and run the script.
python extract_features.py
After running that script, you will realize a bunch of csv files in your dataset. It may take a while for this process to finish. Have a cup of coffee or a line of cocaine. Depends on which level of a rockstar you are.
Before proceeding, you are going to have to create another directory for your pickled_vectors.
mkdir pickled_vectors
After that step you would have a bunch of csv files. Now to convert them into numpy arrays and pickle them, so you can reuse and abuse them. For this we will turn to parse_songs.py. The method which we will utilize is build_vectors
build_vectors(folder_path,keyword,lower_limit)
  folder_path: string for path of dataset
  keyword: string for keyword of feature e.g. "spectral-contrast_peaks". This will be used to match the csv file output by sonic-annotator
  lower_limit: integer for the index of column of the csv file to use. The first column is a timestamp. Sometimes, we do not want this in our array.
For our example:
build_vectors(folder_path="dataset/my_data_set",keyword="spectral-contrast_peaks",lower_limit=1)
build_vectors(folder_path="dataset/my_data_set",keyword="mfcc_coefficients",lower_limit=1)
As before, you should edit the main part of the code. Run the code.
python parse_songs.py
If you check the folder pickled_vectors you should have your pickled vectors saved there.
ls pickled_vectors
If it is empty, you probably mess up something. Call the ambulance.
Training Model
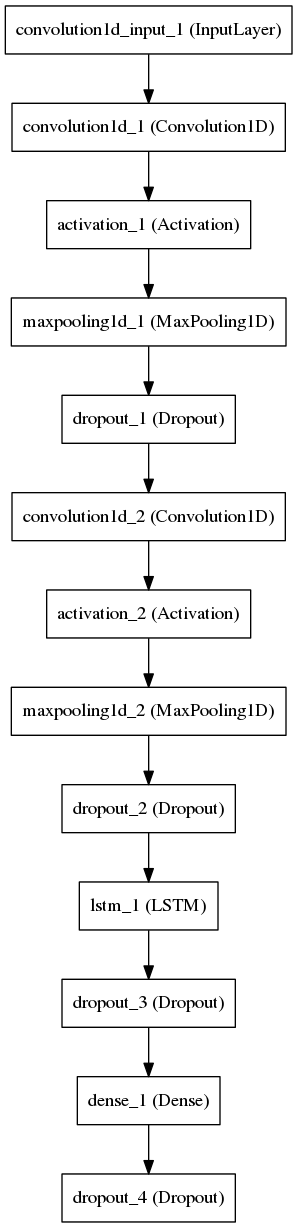
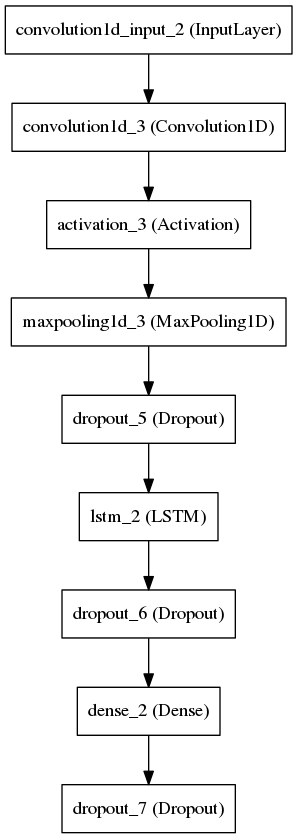
Awesome. You’ve reached here. This is the machine learning step. The most interesting step. There are two separate models for the two different features. The models are in two different scripts, mfcc_model.py and spectral-contrast_peaks_model.py. The merged model is in the script prototype_merged.py. You can train each model separately or combining them. Let’s try just one model first, then the other one then the merged one.
MFCC Model
Change the X, y, X_test, and y_test variable to load the pickled vectors of your desire. If you are following this tutorial, it would be:
X = pickle.load(open("pickled_vectors/mfcc_coefficients_training_vector.pickle","rb"))
y = pickle.load(open("pickled_vectors/mfcc_coefficients_label.pickle","rb"))

X_test = pickle.load(open("pickled_vectors/mfcc_coefficients_evaluation_training_vector.pickle","rb"))
y_test = pickle.load(open("pickled_vectors/mfcc_coefficients_evaluation_label.pickle","rb"))
Now you can run this model with:
python mfcc_model.py
Or if you have configured CUDA on your machine, you can also use keras_gpu.sh. This is probably the wrongest hackiest way to run Theano code with Cuda but, it works for now.
sh keras_gpu.sh mfcc_model.py
One thing that you may have to further edit is the number of outputs of your neural network. On this line:
model.add(Dense(2))
2 refers to 2 genres. If your dataset have 10 genres, change it 10.
Spectral Contrast Model
As before, change the X, y, X_test, and y_test variable to load the pickled vectors of your desire. For our example:
X = pickle.load(open("pickled_vectors/spectral-contrast_peaks_training_vector.pickle","rb"))
y = pickle.load(open("pickled_vectors/spectral-contrast_peaks_label.pickle","rb"))

X_test = pickle.load(open("pickled_vectors/spectral-contrast_peaks_evaluation_training_vector.pickle","rb"))
y_test = pickle.load(open("pickled_vectors/spectral-contrast_peaks_evaluation_label.pickle","rb"))
Now you can run this model with:
python spectral_contrast_peaks_model.py
Or if you have configured CUDA on your machine, you can also use keras_gpu.sh. This is probably the wrongest hackiest way to run Theano code with Cuda but, it works for now.
sh keras_gpu.sh spectral_contrast_peaks_model.py
One thing that you may have to further edit is the number of outputs of your neural network. On this line:
model.add(Dense(2))
2 refers to 2 genres. If your dataset have 10 genres, change it 10.
Merged Model
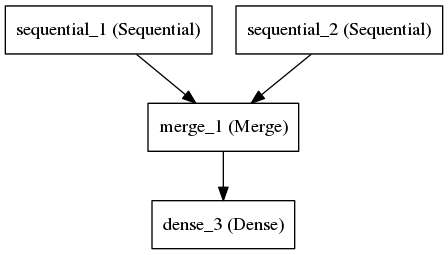
Here, we have merged model. It combining the two previous model and concatenate them into one model. We have two different example (X vectors), so a bit different than before, we will have to change X_1, X_2, X_test_1, X_test_2, y and y_test. For our example:
y = pickle.load(open("pickled_vectors/mfcc_coefficients_label.pickle","rb"))
y_test = pickle.load(open("pickled_vectors/mfcc_coefficients_evaluation_label.pickle","rb"))

X_1 = pickle.load(open("pickled_vectors/mfcc_coefficients_training_vector.pickle","rb"))
X_test_1 = pickle.load(open("pickled_vectors/mfcc_coefficients_evaluation_training_vector.pickle","rb"))

X_2 = pickle.load(open("pickled_vectors/spectral-contrast_peaks_training_vector.pickle","rb"))
X_test_2 = pickle.load(open("pickled_vectors/spectral-contrast_peaks_evaluation_training_vector.pickle","rb"))
One thing that you may have to further edit is the number of outputs of your neural network. On this line:
model.add(Dense(2))
2 refers to 2 genres. If your dataset have 10 genres, change it 10.
Before running this model, you may want to save the weights some where. Let’s create that directory.
mkdir model_weights
Uncomment the following line:
final_model.save_weights("model_weights/merged_model_weights.hdf5",overwrite=True)
Now you can run this model with:
python prototype_merged.py
Or if you have configured CUDA on your machine, you can also use keras_gpu.sh. This is probably the wrongest hackiest way to run Theano code with Cuda but, it works for now.
sh keras_gpu.sh prototype_merged.py
If everything goes well, I would like to congratulate you again. You have successfully trained a deep learning model. It’s an ok-ish model, but at this point you can already use fancy buzz words like deep learning, artificial intelligence or the same technology behind google’s deepmind.
Awesome.
Querying The Model
Now you would like to ask the model. By giving it a song, what would the model predict? Firstly, the song which the model would need to predict, would have to go through the whole pipeline.
The merge model, saved it’s architecture into a json file. This happened in the following part of the prototype_merged.py
  json_string = final_model.to_json()
  with open("model_architecture/merged_model_architecture.json","w") as f:
      f.write(json.dumps(json_string, sort_keys=True,indent=4, separators=(',', ': ')))
The trained weights should be saved in the following hdf5 file:
model_weights/merged_model_weights.hdf5
So what we have to do to query the model are:
- extract the features from the song
- load the model architecture
- load the model weights
- get some prediction
For this purpose, the script querying_genre.py is made. Make sure the right architecture is loaded:
json_string = json.load(open("model_architecture/merged_model_architecture.json","r"))
And also the right weights:
model.load_weights("model_weights/merged_model_weights.hdf5")
Now for the song in question. Let’s put that song inside dataset in the folder query
cd dataset
mkdir query
We shall create another folder for this one particular query.
cd query
mkdir song_1
Let’s grab a song on Youtube with youtube-dl.
youtube-dl -x https://www.youtube.com/watch?v=VDvr08sCPOc
For hacky reasons, the filename of the song needs to correspond to the name of the folder.
mv Remember\ The\ Name\ \(Official\ Video\)\ -\ Fort\ Minor-VDvr08sCPOc.opus song_1.opus
sonic-annotator does not support the opus file format. We are going to need to convert it to mp3 , or what ever format that you like as long as sonic-annotator supports it.
ffmpeg -i song_1.opus song_1.mp3
We are going to have delete the dot opus file. Again, for hacky my-code-kinda-sucks reasons.
rm song_1.opus
Now let’s edit querying_genre.py so that it corresponds to our song query.
song_name_without_ending = "dataset/query/song_1/song_1"
file_format = "mp3"
song_folder = "dataset/query/song_1"
Let’s run this script.
python querying_genre.py
An example of the output would be something like:
[1 1 0 0 1 0 0 1]
What does this mean? The song is split into 30 seconds chunks. The model predicts genre_1 for the first two 30 second chunks and genre_2 for the following. Of course we can do a lot more cleverer and more sophisticated ways to determine what the model determine. But if we take the mode of the output as the model’s decision, we can say that the song that we had, was of genre_2.
Hope you had fun following this tutorial. It is useful to read the documentation of Keras if you want tweak the model.